Manage Multi-Node Clusters with Embedded Cluster
This topic describes managing nodes in clusters created with Replicated Embedded Cluster, including how to add nodes and enable high-availability for multi-node clusters.
Limitations
Multi-node clusters with Embedded Cluster have the following limitations:
-
Setting node roles with the Embedded Cluster Config roles key is Beta.
-
The same Embedded Cluster data directory used at installation is used for all nodes joined to the cluster. This is either the default
/var/lib/embedded-clusterdirectory or the directory set with the--data-dirflag. You cannot choose a different data directory for Embedded Cluster when joining nodes. -
More than one controller node should not be joined at the same time. When joining a controller node, a warning is printed that explains that the user should not attempt to join another node until the controller node joins successfully.
-
The
join print-commandcommand always returns the commands for joining a node with the controller role. It does not support printing the join command for any custom node roles defined in the Embedded Cluster Configroleskey. See Automate Controller Node Joins below.
Requirement
To deploy multi-node clusters with Embedded Cluster, the Multi-node Cluster (Embedded Cluster only) license field must be enabled for the customer. For more information about managing customer licenses, see Create and Manage Customers.
Add Nodes to a Cluster
This section describes how to add nodes to a cluster with Embedded Cluster.
To add a node to a cluster with Embedded Cluster:
-
(Optional) In the Embedded Cluster Config, configure the
roleskey to customize node roles. For more information, see roles in Embedded Cluster Config. When you are done, create and promote a new release with the updated Config. -
Do one of the following:
-
Follow the steps in Online Installation with Embedded Cluster or Air Gap Installation with Embedded Clusterto install. When you see the Nodes screen as part of the installation flow in the Admin Console, continue to the next step.
-
Otherwise, to add a node to an existing cluster:
-
Log in to the Admin Console.
-
If you promoted a new release that configures the
roleskey in the Embedded Cluster Config, update the instance to the new version. See Perform Updates in Embedded Clusters. -
Go to Cluster Management > Add node at the top of the page.
-
-
-
If you configured the
roleskey to customize node roles, select one or more roles for the node.The Admin Console page is updated to display the commands for downloading the Embedded Cluster binary, extracting the binary, and joining the node to the cluster based on the roles you selected. Keep this Admin Console page open for the next steps.
noteThe role cannot be changed after a node is added. If you need to change a node’s role, reset the node and add it again with the new role.
-
SSH onto the node that you want to join.
-
Copy the curl command provided in the Admin Console to download the Embedded Cluster binary and then run it on the node you want to join.
-
Copy and run the tar command to extract the Embedded Cluster binary.
-
Copy and run the join command to add the node to the cluster.
-
In the Admin Console, either on the installation Nodes screen or on the Cluster Management page, verify that the node appears. Wait for the node's status to change to Ready.
-
Repeat these steps for each node you want to add.
Automate Controller Node Joins
With Embedded Cluster, you can use the command line to get the commands for joining controller nodes, rather than having to log into the Admin Console UI to get the commands. This is especially useful when testing multi-node Embedded Cluster installations where you need to automate the process of joining controller nodes to a cluster.
To automate controller node joins with Embedded Cluster:
-
On a node that is already joined to the cluster, run the following command:
sudo ./APP_SLUG join print-commandWhere
APP_SLUGis the unique application slug.The output lists the commands for downloading the Embedded Cluster binary, extracting the binary, and joining a new controller node to the cluster.
Example:
sudo ./your-app-slug join print-command

curl -k https://172.17.0.2:30000/api/v1/embedded-cluster/binary -o embedded-cluster.tar.gz && \
  tar -xvf embedded-cluster.tar.gz && \
  sudo ./embedded-cluster join 172.17.0.2:30000 1234aBcD
Example with JSON output:
sudo ./your-app-slug join print-command -ojson

{
"commands": [
   "curl -k https://172.17.0.2:30000/api/v1/embedded-cluster/binary -o embedded-cluster.tar.gz",
   "tar -xvf embedded-cluster.tar.gz",
   "sudo ./embedded-cluster join 172.17.0.2:30000 1234aBcD"
  ]
} -
On the node that you want to join as a controller, run each of the commands provided in the
join print-commandoutput to download the Embedded Cluster binary, extract the binary, and join the node to the cluster.
High Availability for Multi-Node Clusters
Multi-node clusters are not highly available by default. The first node of the cluster holds important data for Kubernetes and KOTS, such that the loss of this node would be catastrophic for the cluster. Enabling high availability requires that at least three controller nodes are present in the cluster.
Users are automatically prompted to enable HA when joining the third controller node to a cluster. Alternatively, users can enable HA with the enable-ha command after adding three or more controller nodes.
HA Architecture
The following diagram shows the architecture of an HA multi-node Embedded Cluster installation:
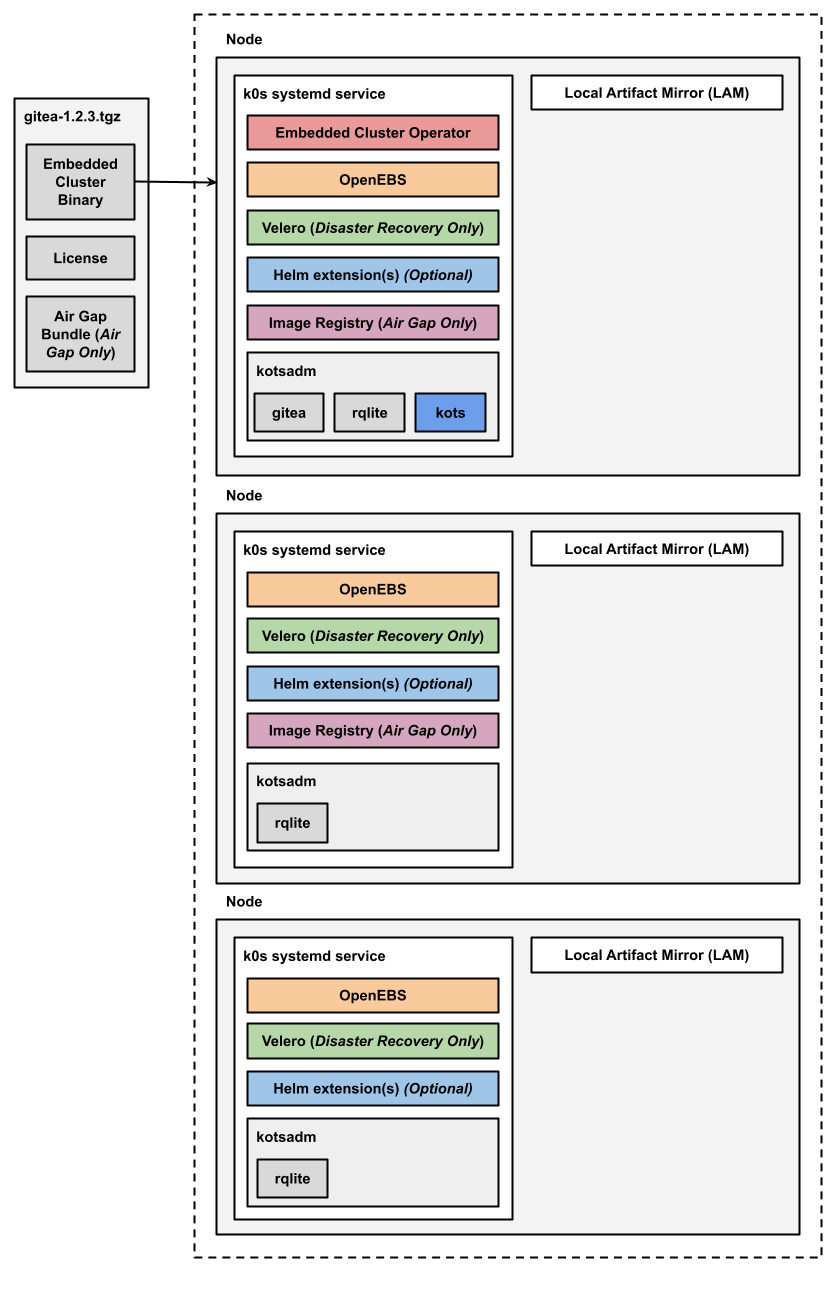
View a larger version of this image
As shown in the diagram above, in HA installations with Embedded Cluster:
- A single replica of the Embedded Cluster Operator is deployed and runs on a controller node.
- A single replica of the KOTS Admin Console is deployed and runs on a controller node.
- Three replicas of rqlite are deployed in the kotsadm namespace. Rqlite is used by KOTS to store information such as support bundles, version history, application metadata, and other small amounts of data needed to manage the application.
- For installations that include disaster recovery, the Velero pod is deployed on one node. The Velero Node Agent runs on each node in the cluster. The Node Agent is a Kubernetes DaemonSet that performs backup and restore tasks such as creating snapshots and transferring data during restores.
- For air gap installations, two replicas of the air gap image registry are deployed.
Any Helm extensions that you include in the Embedded Cluster Config are installed in the cluster depending on the given chart and whether or not it is configured to be deployed with high availability.
For more information about the Embedded Cluster built-in extensions, see Built-In Extensions in Embedded Cluster Overview.
Requirements
Enabling high availability has the following requirements:
-
High availability is supported with Embedded Cluster 1.4.1 and later.
-
The
enable-hacommand is available with Embedded Cluster 2.3.0 and later. -
High availability is supported only for clusters where at least three nodes with the controller role are present.
Best Practices for High Availability
Consider the following best practices and recommendations for creating HA clusters:
-
At least three controller nodes that run the Kubernetes control plane are required for HA. This is because clusters use a quorum system, in which more than half the nodes must be up and reachable. In clusters with three controller nodes, the Kubernetes control plane can continue to operate if one node fails because a quorum can still be reached by the remaining two nodes. By default, with Embedded Cluster, all new nodes added to a cluster are controller nodes. For information about customizing the controller node role, see roles in Embedded Cluster Config.
-
Always use an odd number of controller nodes in HA clusters. Using an odd number of controller nodes ensures that the cluster can make decisions efficiently with quorum calculations. Clusters with an odd number of controller nodes also avoid split-brain scenarios where the cluster runs as two, independent groups of nodes, resulting in inconsistencies and conflicts.
-
You can have any number of worker nodes in HA clusters. Worker nodes do not run the Kubernetes control plane, but can run workloads such as application or Replicated KOTS workloads.
Create a Multi-Node Cluster with High Availability
You can enable high availability for a multi-node cluster when joining the third controller node. Alternatively, you can enable HA for an existing cluster with three or more controller nodes. For more information, see Enable High Availability For an Existing Cluster below.
To create a multi-node HA cluster:
-
Set up a cluster with at least two controller nodes. You can do an online (internet-connected) or air gap installation. For more information, see Online Installation with Embedded Cluster or Air Gap Installation with Embedded Cluster.
-
Get the commands for downloading the Embedded Cluster binary, extracting the binary, and joining the third controller node either in the Admin Console Cluster Management tab or by running the following command on an existing node:
sudo ./APP_SLUG join print-commandWhere
APP_SLUGis the unique application slug. -
SSH onto the node that you want to add as a third controller.
-
On the node that you want to add as a third controller, run each of the commands that you copied.
noteFor Embedded Cluster versions earlier than 2.3.0, pass the
--enable-haflag with thejoincommand. -
In response to the prompt asking if you want to enable high availability, type
yoryes. -
Wait for the migration to HA to complete.
Enable High Availability For an Existing Cluster
To enable high availability for an existing Embedded Cluster installation with three or more controller nodes, run the following command:
sudo ./APP_SLUG enable-ha
Where APP_SLUG is the unique slug for the application.